You can rearrange the channels on your Dreambox to make them easier to navigate but why bother when someone else has already done this for you? This quick guide will have you up and running with a new channel list in a few minutes.
1. Download dreamboxedit from dreamboxedit.com as a zip file
2. Extract the files to a working directory (I used C:/Program Files/Dreamboxedit/ on my PC)
3. Create a working directory for the data files. For simplicity I used C:/Program Files/Dreamboxedit/Data/
4. Download the channel list you want to use from the tm9100.co.uk board at http://www.vhannibal.net or whatever source you prefer
5. Extract the channel list files to your new working directory
6. Launch dreamboxedit.exe
7. On the Profiles tab under Options, change the IP address of Dreambox to the IP address of your Dreambox and click Test IP Connection to confirm that this worked.
8. Change the Password on Dreambox to your Dreambox password (dreambox is the default on manufacturer images).
9. Click Test Username / Password to confirm everything is working so far!
10. Select the file path by choosing the appropriate version for your Enigma firmware. For example if you have a DM 500s, you need to select Satellite receiver. Other models such as DM 500HD and DM 800HD select New Enigma2 settings.
11. If everything works, click the Save button to save this as your default profile
12. You will now be at the dreamboxedit main screen.
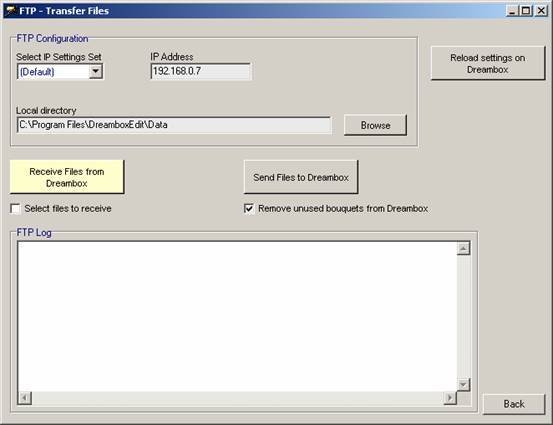
13. Click the FTP Button to load the FTP screen and type the name of your working directory, in my case Data.
14. Click the Back button to return to the main screen and click the folder icon to open a listing of files in your working directory. From this list select the channel list you downloaded earlier and click OK.
15. You should now return to the main screen with your chosen channel list loaded
16. Edit the channel list if required. The most likely edit you will want to do is to sort the Services screen by satellite (Just by clicking the heading Satellite) and then deleting all services for those satellites that you are not able to recieve. Deleting the channel from the services list will also remove it from the bouquets.
17. Once you are happy with the look of your channel list, click the FTP button once more and click the Send Files to Dreambox button.
18. If you have edited the list you will be prompted to save the changes you made, just accept this.
19. Once the FTP completes succesfully, click the Reload settings on Dreambox button to activate the new channel list on your Dreambox
20. Once the FTP log shows the message “Second of two steps completed. Reload command ready.” you are ready to use your new channel list.
21. Press up or down on the bouquet button on the Dreambox remote to load the bouquet menu and press the blue button to select User Bouquets and there you have your shiny new channel list


